Printer Setup | A Complete Step-by-Step Guide for Beginners
Published: 28 Jul 2026
Have you ever bought a new printer, opened the box, and then wondered, “Where do I start?” You are not alone. Many people find printer setup confusing, especially when it comes to connecting to Wi-Fi, installing drivers, or printing the first page. A small mistake can stop your printer from working and leave you feeling frustrated.
The good news is that setting up a printer is much easier than it seems. In this guide, you will learn how to set up a printer step by step. Whether you have a wired or wireless printer, the process is simple when you follow the right steps. We will show you how to unpack the printer, install ink or toner, load paper, connect it to your computer or phone, and print your first test page.
You will also learn how to fix common setup problems that many beginners face. By the end of this guide, your printer will be ready to use with confidence. Even if this is your first time setting up a printer, these easy instructions will help you get started quickly and avoid common mistakes.
What You Need Before Setting Up a Printer?
Before you start, make sure you have everything ready. This makes the printer setup process faster and helps you avoid common problems.
- Your printer: Remove all packing tape and protective materials.
- Power cable: Plug the printer into a working power outlet.
- Ink or toner cartridges: Use the cartridges that came with your printer or compatible replacements.
- Paper: Load the correct paper size into the input tray.
- Computer, laptop, or mobile device: You will need a device to connect and print.
- Wi-Fi network or USB cable: Choose a wireless or wired connection based on your printer model.
- Printer drivers or setup software: Install the latest printer driver if your device does not install it automatically.
How to Set Up a Printer (Step-by-Step)
Before you begin, follow these simple step-by-step instructions to set up your printer correctly, connect it to your device, and get it ready for smooth, hassle-free printing.
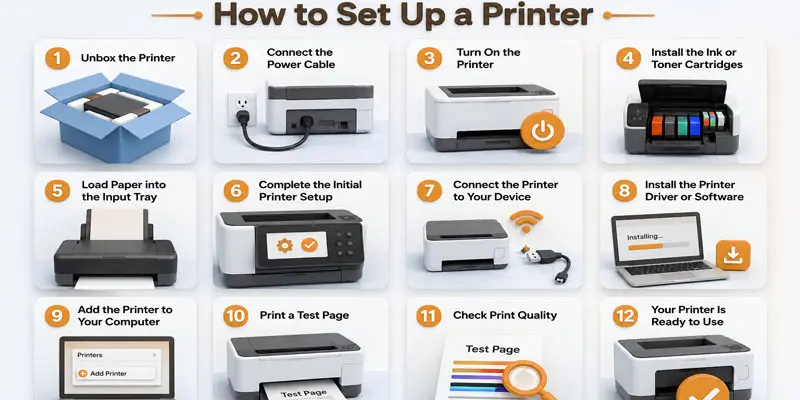
- Unbox the Printer
- Connect the Power Cable
- Turn On the Printer
- Install the Ink or Toner Cartridges
- Load Paper into the Input Tray
- Complete the Initial Printer Setup
- Connect the Printer to Your Device
- Install the Printer Driver or Software
- Add the Printer to Your Computer
- Print a Test Page
- Check Print Quality
- Your Printer Is Ready to Use
Unbox the Printer
Carefully remove the printer from the box. Take off all the protective tape, plastic covers, and packing materials. Check that all the included items, such as the power cable, ink or toner cartridges, and user manual, are in the box before you continue.
Connect the Power Cable
Plug the power cable into the printer and then connect the other end to a power outlet. Press the power button to turn on the printer. Wait a few moments until the printer finishes starting up and is ready for the next setup step.
Turn On the Printer
Press the Power button to turn on the printer. Wait until the printer finishes starting up and the display or indicator light becomes steady. If the printer has a setup screen, follow the on-screen instructions to continue.
Install the Ink or Toner Cartridges
Open the printer cover and find the cartridge compartment. Remove the protective seal from the ink or toner cartridges before inserting them. Place each cartridge into the correct slot until it clicks into place, then close the printer cover securely.
Load Paper into the Input Tray
Pull out the input paper tray and place a stack of clean paper inside. Adjust the paper guides so they fit the paper without bending it. Make sure the paper is straight and not overfilled before sliding the tray back into the printer.
Complete the Initial Printer Setup
Follow the instructions shown on the printer screen. Select your preferred language, country, and other basic settings if asked. Once the setup is complete, the printer will be ready to connect to your computer, laptop, or mobile device.
Connect the Printer to Your Device
Link your printer to your computer, laptop, or smartphone using either a USB cable or a Wi-Fi connection. For wireless setup, confirm that both the printer and your device are connected to the same Wi-Fi network before you begin. Wait for your device to detect the printer before moving to the next step.
Install the Printer Driver or Software
Install the printer driver or setup software on your computer if it does not install automatically. You can use the installation file that came with the printer or download the latest version from the printer manufacturer’s website. Follow the on-screen instructions to complete the installation.
Add the Printer to Your Computer
Open your computer’s Settings and go to Printers & Scanners. Select Add a Printer and wait for your computer to find the printer. Click your printer’s name and follow the on-screen instructions to finish the setup.
Print a Test Page
Print a test page to make sure your printer is working correctly. Check that the text and images are clear and the colours print properly. If the test page looks good, your printer is ready to use.
Check Print Quality
Look at the printed page carefully. Make sure the text is sharp, the colours are clear, and there are no lines or smudges. If you notice any print problems, clean the printhead or check the ink or toner before printing again.
Your Printer Is Ready to Use
Your printer is now set up and ready to print. You can start printing documents, photos, or school and office work with ease. To keep your printer working well, use the correct paper, update the printer software, and perform regular maintenance.
How to Connect a Printer to Your Computer?
Connecting a printer to your computer is simple. Most printers support USB, Wi-Fi, or Ethernet connections. Choose the method that works best for your printer and device.
- USB connection: Plug the USB cable into your printer and computer. Your computer may install the printer automatically.
- Wi-Fi connection: Connect the printer to your Wi-Fi network. Make sure your computer is on the same network.
- Ethernet connection: Use an Ethernet cable to link your printer directly to the router. This provides a reliable and steady network connection for printing.
- Add the printer: Open Printers & Scanners in your computer settings and select Add a Printer.
- Install the printer driver: Download and install the latest printer driver if your computer does not detect the printer automatically.
How to Install Printer Driver?
A printer driver is a small piece of software that helps your computer communicate with your printer. Without the correct driver, your printer may not work properly or may not be detected at all. Many modern printers install the driver automatically when you connect them to your computer. If the driver is not installed automatically, visit the printer manufacturer’s official website and download the most recent version for your printer model.
Simply choose your printer model, download the software, and follow the on-screen instructions to complete the installation. After the setup finishes, restart your computer if prompted. This helps the new driver work correctly. Finally, print a test page to make sure everything is working as expected. For example, if your computer cannot find a new wireless printer, installing the correct driver often solves the problem and allows you to start printing without any issues.
How to Set Up a Printer on Windows?
Setting up a printer on a Windows computer is quick and easy. Follow these simple steps to connect your printer and start printing.
- Turn on your printer and connect it to your computer using a USB cable or Wi-Fi.
- Open the Settings app, then select Bluetooth & devices and choose Printers & scanners from the menu.
- Click Add device and wait while Windows searches for available printers.
- Select your printer from the list and click Add device.
- If Windows asks for a printer driver, install the recommended driver or download the latest one from the printer manufacturer’s website.
- Set the printer as your default printer if you plan to use it regularly.
- After completing the setup, send a sample print to verify that the printer is ready and responding correctly.
How to Set Up a Printer on Mac?
Setting up a printer on a Mac is simple. Follow these easy steps to connect your printer and start printing.
- Turn on your printer and connect it to your Mac using Wi-Fi or a USB cable.
- Open System Settings and click Printers & Scanners.
- Click the Add Printer, Scanner, or Fax button.
- Find your printer in the list of detected devices and select it to continue the setup.
- If needed, macOS will automatically download and install the correct printer driver or software.
- Complete the installation by following the instructions displayed on your screen.
- Set the printer as your default printer if you use it often.
- Print a test page or any document to check that the printer is working correctly.
How to Set Up a Printer on Android?
Connecting a printer to your Android phone takes only a few simple steps. Follow these simple steps to connect your printer and print from your mobile device.
- Turn on your printer and connect it to the same Wi-Fi network as your Android phone.
- Open Settings on your phone and go to Connected devices or Printing (the name may vary by device).
- Enable the Default Print Service or install your printer manufacturer’s print app if needed.
- Open the document, photo, or web page you want to print.
- Tap the Share or Menu icon and select Print.
- Choose your printer from the list of available devices.
- Choose your preferred print options, including paper size and the number of copies, then tap the Print button to begin printing.
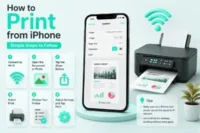
How to Set Up a Printer on iPhone or iPad?
Setting up a printer on an iPhone or iPad is easy, especially if your printer supports AirPrint. Follow these simple steps to start printing.
- Turn on your printer and connect it to the same Wi-Fi network as your iPhone or iPad.
- Make sure your printer supports AirPrint or install the printer manufacturer’s app if required.
- Open the photo, document, email, or web page you want to print.
- Tap the Share icon and select Print.
- Choose your printer from the list of available devices.
- Select the number of copies, paper size, or other print settings if needed.
- Tap Print to send your document to the printer.
How to Test Your Printer After Setup?
After you finish the printer setup, it is important to test your printer before using it regularly. Start by printing a test page from your computer or the printer’s settings menu. Check that the text is clear, the colours look accurate, and there are no lines, smudges, or missing areas on the page. If your printer has a scanner, scan a document to make sure it works properly as well.
You should also confirm that your computer or mobile device can communicate with the printer without any errors. For example, print a simple document or a family photo to check the overall print quality. If everything looks good, your printer is ready for everyday use.
What are the Most Common Printer Setup Problems and How Can You Fix Them?
If your printer is not working after setup, do not worry. Most printer setup problems are easy to fix with a few simple steps.
- Printer not turning on: Check that the power cable is connected securely and the power outlet is working.
- Printer not connecting to Wi-Fi: Make sure the printer and your device are connected to the same Wi-Fi network.
- Computer cannot find the printer: Restart both the printer and your computer, then try adding the printer again.
- Printer driver not installed: Download and install the latest printer driver for your printer model.
- Printer showing offline: Set the printer as the default printer and check the connection.
- Poor print quality: Clean the printhead and make sure the ink or toner is not empty.
- Paper jam: Remove the jammed paper carefully and reload the paper correctly.
What are the Best Tips for a Smooth Printer Setup?
Follow these simple tips to make your printer setup quick and hassle-free.
- Read the printer manual before you begin the setup process.
- Remove all packing tape and protective materials from the printer.
- Place the printer on a flat, stable surface with enough space around it.
- Connect the printer to a reliable power source before turning it on.
- Use a strong and stable Wi-Fi connection for wireless printer setup.
- Install the latest printer driver or software for your printer model.
- Load the correct paper size and install the ink or toner cartridges properly.
- Print a test page to make sure everything is working correctly.
- Keep your printer firmware updated for better performance and security.
What Printer Setup Mistakes Should You Avoid?
Avoiding these common mistakes can help you complete your printer setup quickly and prevent future printing problems.
- Do not skip reading the setup guide that comes with your printer.
- Remove all protective tape and packaging before turning on the printer.
- Make sure the ink or toner cartridges are installed in the correct slots.
- Load the correct paper size and avoid overfilling the paper tray.
- Do not connect the printer to the wrong Wi-Fi network. Your device and printer should use the same network.
- Install the correct printer driver instead of using an outdated version.
- Do not unplug the printer while it is installing software or updating firmware.
- Always print a test page to confirm the setup is complete.
Final Thoughts
Learning how to set up a printer is simple when you follow the correct steps. From installing drivers to connecting your printer and printing a test page, each step helps ensure smooth performance. If you run into problems, use the troubleshooting tips to get back on track. Now it’s your turn to set up your printer, start printing with confidence, and explore more helpful printer guides to keep your device working at its best.
FAQs
Turn on your HP printer, install the ink or toner, load paper, and complete the on-screen setup. Then connect the printer to your Wi-Fi or computer, install the latest printer driver, and print a test page to confirm it is ready.
Reset the used HP printer to its factory settings, remove old Wi-Fi details, install fresh ink or toner if needed, and connect it to your computer or Wi-Fi. Finish by installing the latest HP printer driver and printing a test page.
You can set up an HP printer without an app by connecting it with a USB cable or Wi-Fi and using your computer’s built-in printer settings. Install the printer driver if prompted, then print a test page to verify the setup.
Most HP printers do not have a dedicated reset button. Instead, you can reset the printer by using the control panel menu or following the reset steps recommended for your specific HP printer model.
To fix an HP printer showing offline, restart the printer and computer, check the Wi-Fi or USB connection, set the printer as the default printer, and disable Use Printer Offline in your computer’s printer settings.


- Be Respectful
- Stay Relevant
- Stay Positive
- True Feedback
- Encourage Discussion
- Avoid Spamming
- No Fake News
- Don't Copy-Paste
- No Personal Attacks
- Be Respectful
- Stay Relevant
- Stay Positive
- True Feedback
- Encourage Discussion
- Avoid Spamming
- No Fake News
- Don't Copy-Paste
- No Personal Attacks
